Kubernetes- Interview Question- Part1

1. Explain Kubernetes Architecture
Kubernetes is based on a master-slave module.

The worker module consists of 4 components:
- API Server: This is a primary manager responsible for exposing the Kubernetes API, which allows users to interact with the cluster.
It also provides Authentication. - Scheduler: Decision-making for deploying pods within the cluster.
Which pod will schedule on which node. - Controller Manager: Control and Manage cluster, Ensure the desired state matches the actual state.
- ETCD: It's a database that stores configuration date, state, and metadata.
The Worker module consists of 3 components:
- Kubelet: It is responsible for ensuring that containers are running in a Pod.
- Container Runtime: Software responsible for running containers.
- Kube-proxy: Maintains network rules on nodes.
- Pods: The smallest deployable units of computing that can be created and managed in Kubernetes.
2. What are init containers, and how are they different from regular containers within a pod?
Init containers are special containers that run and complete before other containers in the same pod start.
They are primarily used to perform initialization tasks such as setting up configuration files, initializing databases, or waiting for external services to become available.
apiVersion: v1
kind: Pod
metadata:
  name: my-pod
spec:
  containers:
  - name: main-container
    image: nginx:latest
    # Add other container specifications here

  initContainers:
  - name: init-container
    image: busybox:latest
    command: ['sh', '-c', 'echo Initializing...']
    # Add other init container specifications here

  # Add other pod specifications here
Init containers differ from regular containers within a pod in that they run to completion before the main application containers start, and they do not share the same lifecycle or resources as the main containers.
3. What are pods and Commands for the same
A pod is the smallest and most basic deployable object in Kubernetes.
It represents a single instance of a running process in your cluster.
#Create a Pod:
kubectl create pod <pod-name> --image=<container-image>

#List Pods:
kubectl get pods

#Describe a Pod:
kubectl describe pod <pod-name>

#Delete a Pod:
kubectl delete pod <pod-name>

#Execute Command in a Pod:
kubectl exec -it <pod-name> --<command>

#Port Forwarding to a Pod:
kubectl port-forward <pod-name> <local-port>:<remote-port>

#View Logs of a Pod:
kubectl logs <pod-name>

#Attach to a Running Container in a Pod:
kubectl attach -it <pod-name> -c <container-name>

#Copy Files to/from a Pod:
#From Pod:
kubectl cp <pod-name>:/remote/path /local/path

#To Pod:
kubectl cp /local/path <pod-name>:/remote/path

#Execute Command in a Specific Container of a Pod:
kubectl exec -it <pod-name> -c <container-name> -- <command>

#Get Pod's IP Address:
kubectl get pod <pod-name> -o jsonpath='{.status.podIP}'

#Get Pod's YAML Configuration:
kubectl get pod <pod-name> -o yaml
4. Difference between describe pod and inspect pod
kubectl describe pod <pod-name> provides detailed information about a pod's configuration and status,
the term "inspect pod" is used informally to refer to examining or analyzing the pod's characteristics or status using various Kubernetes commands.
5. Manage labels in Kubernetes commands:
#List Pods with Labels:
kubectl get pods --show-lables

#Add or Update Labels to a Pod:
kubectl label pod <pod-name> <label-key>=<label-value>

#Remove a Label from a Pod:
kubectl label pod <pod-name> <label-key>-

#List Pods with a Specific Label:
kubectl get pod -l <label-key>=<label-value>

#List Pods with Label Selectors:
kubectl get pods --selector=<label-selector>

#Update Labels for Multiple Pods using Selector:
kubectl label pod -l <label-selector> <label-key>=<label-value>

#Label Nodes:
kubectl node <node-name> <label-key>=<label-value>

#List Nodes with Labels:
kubectl get nodes --show-labels

#Remove a Label from a Node:
kubectl label node <node-name> <label-key>-

#Label Namespaces:
kubectl label namespace <namespace-name> <label-key>=<label-value>

#List Namespaces with Labels:
kubectl get namespaces --show-labels

#Remove a Label from a Namespace:
kubectl label namespace <namespace-name> <label-key>-
6. What is Namespace?
Namespaces in Kubernetes provide a way to organize and isolate resources within a cluster.
Type of Namespaces:
- Default: This is the default namespace
- Kube-public: Public access without Authentication
- Kube-system: Kube cluster management workspace
- Kube-node-lease: Heartbeat performance
#Create a Namespace:
kubectl create namespace <namespace-name>

#List Namespaces:
kubectl get namespaces

#Switch Context to a Namespace:
kubectl config set-context --current --namespace=<namespace-name>

#Delete a Namespace (and all resources within it):
kubectl delete namespace <namespace-name>

#View Resources in a Namespace:
kubectl get pods -n <namespace-name>
kubectl get deployments -n <namespace-name>
apiVersion: v1
kind: ResourceQuota
metadata:
name: <resource-quota-name>
namespace: <namespace-name>
spec:
hard:
pods: "10"
requests.cpu: "4"
requests.memory: "2Gi"
limits.cpu: "6"
limits.memory: "4Gi"7. What are Kubernetes Services?
Kubernetes Services are an essential component for enabling communication between different parts of an application running on a Kubernetes cluster.
There are four types of Kubernetes services — ClusterIP, NodePort, LoadBalancer and ExternalName]
#Create a Service:
kubectl create -f service.yaml

#Get Information about Services:
kubectl get services

#Describe a Service:
kubectl describe service <service-name>

#Delete a Service:
kubectl delete service <service-name>

#Edit a Service:
kubectl edit service <service-name>

#Check Service Endpoints:
kubectl get endpoints <service-name>

#Edit Service Endpoints:
kubectl edit endpoints <service-name>

#Expose a Deployment as a service :
kubectl expose deployment <deployment-name> --type=NodePort --port=<port> --target-port=<target-port>- Cluster IP (By Default): Expose port Inside the cluster ( Provide Internal Connectivity )
# Service

apiVersion: v1
kind: Service
metadata:
  name: my-service
spec:
  selector:
    app: my-app
  ports:
    - protocol: TCP
      port: 80
      targetPort: 8080
2. NodePort: It enables access to the service from outside the cluster (Provides access to external traffic)
# service.yaml

apiVersion: v1
kind: Service
metadata:
  name: my-service
spec:
  selector:
    app: my-app
  ports:
    - protocol: TCP
      port: 80
      targetPort: 8080
  type: NodePort
3. LoadBalancer: LoadBalancer provides internal and external connectivity
#Service.yaml

apiVersion: v1
kind: Service
metadata:
  name: my-loadbalancer-service
spec:
  selector:
    app: my-app
  ports:
    - protocol: TCP
      port: 80  # External connectivity: Exposes port 80 externally
      targetPort: 8080  # Internal connectivity: Forwards traffic to port 8080 on selected pods
  type: LoadBalancer  # External connectivity: Creates an external load balancer
4. Headless Service: Headless service allows the client to directly communicate with the Pods. Do not assign IP to itself.
#Service.yaml

apiVersion: v1
kind: Service
metadata:
  name: my-headless-service
spec:
  clusterIP: None  # Specifies that this is a headless service
  selector:
    app: my-app
  ports:
    - protocol: TCP
      port: 80
8. Difference between Replication Controller and Replicaset?
ReplicationController and ReplicaSet are both Kubernetes controllers used to ensure that a specified number of pod replicas are running at any given time.
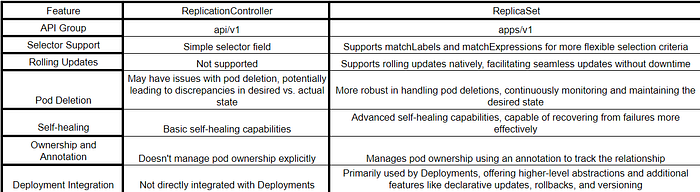
Replication Controller:
- Example: Managing a stateless web server with a fixed number of replicas.
- Selector Support: Uses simple selector fields.
- Rolling Updates: Not supported; manual deletion and recreation are required for updates.
- Pod Deletion: May have issues with pod deletion, potentially leading to discrepancies.
- Self-healing: Basic; may not effectively recover from pod failures.
- Ownership and Annotation: Doesn’t manage pod ownership explicitly.
- Deployment Integration: Not directly integrated with Deployments.
apiVersion: v1
kind: ReplicationController
metadata:
  name: my-replication-controller
spec:
  replicas: 3
  selector:
    app: my-app
  template:
    metadata:
      labels:
        app: my-app
    spec:
      containers:
      - name: my-container
        image: nginx:latest
        ports:
        - containerPort: 80
ReplicaSet:
- Example: Orchestrating a stateless microservice with rolling updates.
- Selector Support: Supports matchLabels and matchExpressions for flexible selection criteria.
- Rolling Updates: Supported natively, enabling seamless updates without downtime.
- Pod Deletion: More robust handling, continuously monitoring and maintaining the desired state.
- Self-healing: Advanced; effectively recovers from failures by creating new pods.
- Ownership and Annotation: Manages pod ownership using annotations for tracking.
- Deployment Integration: Primarily used by Deployments, offering higher-level abstractions and additional features like declarative updates and rollbacks.
apiVersion: apps/v1
kind: ReplicaSet
metadata:
  name: my-replicaset
spec:
  replicas: 3
  selector:
    matchLabels:
      app: my-app
  template:
    metadata:
      labels:
        app: my-app
    spec:
      containers:
      - name: my-container
        image: nginx:latest
        ports:
        - containerPort: 80
9. Explain Depolyements:
Manage the deployment and scaling of a set of replica Pods.
Types of Deployment Strategies:
1. Rolling Update Deployment: Default Strategies (To update a system without causing downtime)
Updates by Replacing old instance with new one
This creates a pod before deleting.
2. Recreate Deployment: This Terminate the instance and creates new ones
This may lead to downtime
3. Blue-green Deployment: This maintains two identical production environment
One active: Blue, One Inactive: Green
This has zero downtime
Provide easy rollback and safe environment for testing new version
4. Canary Deployment: Involves rolling out a new version to a small subset of users or instances first.
By Monitoring metrics and user feedback,
we can evaluate the performance of the new version in production with minimal impact before proceeding with the full rollout.
5. AB testing Deployment: Allow us to deploy multiple versions simultaneously and direct a portion of the traffic to each version.
6. Multicluster Deployment: For Redundancy, performance optimization, or Regulatory compliance
We can orchestrate deployment across multiple Kubernetes clusters
Eg : Kubernetes federation Gitops
10. What you understand by ResourceQuota:
ResourceQuota in Kubernetes is like setting rules to make sure different parts of the system don’t use too much CPU, memory, or other resources, keeping everything running smoothly and fairly for everyone.
apiVersion: v1
kind: ResourceQuota
metadata:
  name: example-resource-quota
spec:
  hard:

#OBJECT BASED QUOTA
    pods: "10"            # Maximum number of pods allowed in the namespace

#COMPUTE BASED QUOTA
requests.cpu: "2"     # Maximum total CPU requests allowed (in millicores)
    requests.memory: 4Gi  # Maximum total memory requests allowed
    limits.cpu: "4"       # Maximum total CPU limits allowed (in millicores)
    limits.memory: 8Gi    # Maximum total memory limits allowed
    persistentvolumeclaims: "5"  # Maximum number of persistent volume claims allowed
11. What you understand by LimitRange:
LimitRange in Kubernetes acts like a set of rules for resource usage within a namespace, providing defaults and constraints for pods and containers.
It ensures fair resource allocation, prevents resource abuse, and helps maintain stability and efficiency in the Kubernetes cluster.
apiVersion: v1
kind: LimitRange
metadata:
  name: example-limit-range
spec:
  limits:
  - type: Container
    max:
      memory: 1Gi        # Maximum memory limit per container
      cpu: 500m          # Maximum CPU limit per container (500 millicores)
    default:
      memory: 512Mi     # Default memory request per container
      cpu: 250m          # Default CPU request per container (250 millicores)
kubectl apply -f limit-range.yaml12. What you understand by ConfigMap:
Let’s you inject configuration data into the application.
ConfigMap in Kubernetes is a flexible and scalable way to manage configuration data for your applications,
allowing you to separate configuration from application code, make dynamic updates to configuration, and easily consume configuration data within your Kubernetes cluster.
apiVersion: v1
kind: ConfigMap
metadata:
  name: example-configmap
data:
  database.properties: |
    database.url=jdbc:mysql://localhost:3306/mydb
    database.username=admin
    database.password=secretpassword
  app.properties: |
    app.debug=true
    app.max_connections=100
#Create a ConfigMap from Literal:
kubectl create configmap <configmap-name> --from-literal=<key1>=<value1> --from-literal=<key2>=<value2>
#Create a ConfigMap from File:
kubectl create configmap <configmap-name> --from-file=<path/to/file>
#Create a ConfigMap from Directory:
kubectl create configmap <configmap-name> --from-file=<path/to/directory>
#View ConfigMaps:
kubectl get configmaps
#View Details of a ConfigMap:
kubectl describe configmap <configmap-name>
#Edit a ConfigMap:
kubectl edit configmap <configmap-name>
#Delete a ConfigMap:
kubectl delete configmap <configmap-name>
#Apply Changes to a ConfigMap from File:
kubectl apply -f <path/to/configmap.yaml>
#Get ConfigMap Data:
kubectl get configmap <configmap-name> -o yaml
#Use ConfigMap in a Pod:
volumes:
- name: <volume-name>
configMap:
name: <configmap-name>
#As Environment Variables:
envFrom:
- configMapRef:
name: <configmap-name>
#As a file
spec:
containers:
- name: mycontainer
image: myimage
volumeMounts:
- name: config-volume
mountPath: /etc/config
volumes:
- name: config-volume
configMap:
name: example-configmap13. What is Taint and Toleration?
Taints and tolerations are mechanisms used to control which nodes can schedule pods.
Taints in Kubernetes mark nodes with characteristics that repel certain pods.
Toleration allows pods to tolerate specific taints, enabling them to be scheduled on tainted nodes.
Apply Taint to Node:
kubectl taint nodes <node-name> key=value:effectDefine Pod with Toleration:
apiVersion: v1
kind: Pod
metadata:
  name: my-pod
spec:
  containers:
  - name: my-container
    image: nginx
  tolerations:
  - key: "key"            # Key of the taint
    operator: "Equal"     # Operator to match the key-value pair (optional)
    value: "value"        # Value of the taint (optional)
    effect: "NoSchedule"  # Effect of the taint
The different effects that can be associated with a taint:
- NoSchedule: Pod will be scheduled if the toleration is not present.
- PreferNoSchedule: No Gurrenty- Can schedule and Can not be scheduled
- NoExecute: Delete the pod and schedule a new pod
14. What is Node Affinity?
Node affinity in Kubernetes is a feature that allows you to influence pod scheduling decisions based on node labels.
- RequiredDuringSchedulingIgnoredDuringExecution: Pod will not schedule if not match
- Specifies rules considered during pod scheduling.
- Pods must be scheduled on nodes that satisfy these rules.
- Once scheduled, affinity rules are ignored.
apiVersion: v1
kind: Pod
metadata:
  name: required-node-affinity-pod
spec:
  containers:
  - name: nginx-container
    image: nginx
  affinity:
    nodeAffinity:
      requiredDuringSchedulingIgnoredDuringExecution:
        nodeSelectorTerms:
        - matchExpressions:
          - key: type
            operator: In
            values:
            - worker
2. PreferredDuringSchedulingIgnoredDuringExecution: Pod can schedule on any node if not match
- Specifies preferences for pod scheduling.
- Pods prefer nodes that satisfy these rules but can be scheduled elsewhere if needed.
- Once scheduled, affinity rules are ignored.
apiVersion: v1
kind: Pod
metadata:
  name: preferred-node-affinity-pod
spec:
  containers:
  - name: nginx-container
    image: nginx
  affinity:
    nodeAffinity:
      preferredDuringSchedulingIgnoredDuringExecution:
      - weight: 100
        preference:
          matchExpressions:
          - key: zone
            operator: In
            values:
            - us-west
15. What are volumes in Kubernetes:
There are several types of volumes that can be used to persist and share data between containers in pods:
- EmptyDir:
- An EmptyDir volume is created when a pod is assigned to a node, and it exists as long as the pod is running on that node.
- It is initially empty and is used to share data between containers in the same pod.
- The data in an EmptyDir volume is lost when the pod is deleted or restarted.
apiVersion: v1
kind: Pod
metadata:
  name: emptydir-pod
spec:
  containers:
  - name: nginx-container
    image: nginx
    volumeMounts:
    - name: shared-data
      mountPath: /data
  volumes:
  - name: shared-data
    emptyDir: {}
2. HostPath:
- A HostPath volume mounts a file or directory from the host node’s filesystem into the pod.
- It allows pods to access files or directories on the node’s filesystem.
- HostPath volumes are not suitable for production use in multi-node clusters because they can lead to data inconsistency and security risks.
apiVersion: v1
kind: Pod
metadata:
  name: hostpath-pod
spec:
  containers:
  - name: nginx-container
    image: nginx
    volumeMounts:
    - name: host-path
      mountPath: /host
  volumes:
  - name: host-path
    hostPath:
      path: /var/log
3. PersistentVolume (PV):
PersistentVolume is like a storage area in a computer system that holds data even when the applications using it are turned off. So, even if your computer or application shuts down, the data in the PersistentVolume stays safe and sound until you need it again.
apiVersion: v1
kind: PersistentVolume
metadata:
  name: my-pv
spec:
  capacity:
    storage: 5Gi
  accessModes:
  - ReadWriteOnce
  persistentVolumeReclaimPolicy: Retain
  hostPath:
    path: /mnt/data
4. PersistentVolumeClaim (PVC):
When you create a PersistentVolumeClaim, you’re basically asking the system for a certain amount of storage space to store your data or files.
It’s like saying, “Hey, I need this much storage, please give it to me.” Once the system approves your request, it finds an available PersistentVolume (the storage space) that matches your needs and assigns it to you.
Then, you can use that space to store your data.
apiVersion: v1
kind: PersistentVolumeClaim
metadata:
  name: my-pvc
spec:
  accessModes:
  - ReadWriteOnce
  resources:
    requests:
      storage: 1Gi
5. Amazon Elastic Kubernetes Service (EKS)
EBS :
apiVersion: v1
kind: PersistentVolume
metadata:
  name: ebs-pv
spec:
  capacity:
    storage: 5Gi
  volumeMode: Filesystem
  accessModes:
    - ReadWriteOnce
  storageClassName: gp2
  awsElasticBlockStore:
    volumeID: <EBS_VOLUME_ID>
    fsType: ext4

---

apiVersion: v1
kind: PersistentVolumeClaim
metadata:
  name: ebs-pvc
spec:
  accessModes:
    - ReadWriteOnce
  resources:
    requests:
      storage: 5Gi
EFS:
apiVersion: v1
kind: PersistentVolume
metadata:
  name: efs-pv
spec:
  capacity:
    storage: 5Gi
  volumeMode: Filesystem
  accessModes:
    - ReadWriteMany
  storageClassName: efs-sc
  nfs:
    server: <EFS_SERVER_IP>
    path: /

---

apiVersion: v1
kind: PersistentVolumeClaim
metadata:
  name: efs-pvc
spec:
  accessModes:
    - ReadWriteMany
  resources:
    requests:
      storage: 5Gi
16. What are Kubernete's Secrets, Explain
Kubernetes Secrets is a secure way to store sensitive information within Kubernetes clusters, such as passwords, OAuth tokens, SSH keys, and other confidential data.
- Storage: Kubernetes Secrets stores sensitive data securely within the cluster’s ETCD database.
- Base64 Encoding: Secrets are encoded in Base64 format to prevent plain-text exposure.
- Usage: Secrets can be mounted into pods as files or environment variables for secure access by applications.
- Access Control: Role-Based Access Control (RBAC) ensures only authorized entities can manage Secrets.
- Updates and Rotations: Secrets should be periodically rotated for enhanced security by generating new values.
- Secret Types: Kubernetes supports various Secret types tailored for different sensitive information.
- Immutable: Once created, Secrets cannot be updated directly; they must be recreated with new data.
#Create a Secret:

kubectl create secret <secret_type> <secret_name> --from-literal=<key>=<value>

#View Secrets:

kubectl get secrets

#View Secret Details:

kubectl describe secret <secret_name>

#Decode a Secret:

kubectl get secret <secret_name> -o jsonpath="{.data.<key>}" | base64 --decode

#Delete a Secret:

kubectl create secret generic <secret_name> --from-file=<path_to_file>

#Create a Secret from a File:

kubectl create secret generic <secret_name> --from-file=<path_to_file>

#Create a TLS Secret:

kubectl create secret tls <tls_secret_name> --cert=<path_to_cert_file> --key=<path_to_key_file>

#Create a Docker Registry Secret:

kubectl create secret docker-registry <registry_secret_name> --docker-server=<server> --docker-username=<username> --docker-password=<password> --docker-email=<email>
#Mount a Secret as a Volume (in a Pod's YAML):
volumes:
- name: <volume_name>
secret:
secretName: <secret_name>
#Use a Secret as an Environment Variable (in a Pod's YAML):

env:
  - name: <env_variable_name>
    valueFrom:
      secretKeyRef:
        name: <secret_name>
        key: <key>
If you found this guide helpful then do click on 👏 the button.
Follow for more Learning like this 😊
If there’s a specific topic you’re curious about, feel free to drop a personal note or comment. I’m here to help you explore whatever interests you!
Thanks for spending your valuable time learning to enhance your knowledge!